Table Of Content

Fully open your clamps and set them down side by side, about 2 inches closer together than the full width of your panels. Lay the boards across them, jointed faces down, and press the boards together by hand to make sure all the seams are tight. If they aren’t, clean them up on your jointer or table saw.
RIBA House of the Year 2022 Winner - e-architect
RIBA House of the Year 2022 Winner.
Posted: Wed, 04 Jan 2023 08:00:00 GMT [source]
Building the House
If you’re so inclined, you may decide to tackle the building of an entire bat condo. Just be sure it’s a project you’re ready to invest in. Here are a few bat house plans that you can follow or gain inspiration from to build your own. Once you’re satisfied with the layout, spread a line of glue on each touching edge of the boards, and press them together. Tighten the clamps until glue squeezes out of the seams.
Introduction: Batman Logo Bat Box House
Aside from encouraging people to build a bat house, it also provides information about other environmental issues that others can also get involved in. The website which features the tutorial for this bat house provides interested people with a PDF copy that anyone can easily print out. And even if this wood looks old, it can be sanded so that it will look as smooth as what can be seen in the second image above.
Batman Logo Bat Box House
But then I checked their website and they have a map where you look up what color to paint your bat house. You could just put up a bat house and hope for the best, but there are several things you can do to better attract them. Basically, you'll want to recreate the feeling of a cave. The inside of the bat box should be warm and dark and have an unfinished interior so they have a surface that they can hang onto when they're inside. If you already have bats, giving them a home of their own will discourage them from nesting in other areas of your house.
As a measure to ensure no bats enter your home again, many companies use hardware cloth along with caulk. Though bats do not gnaw through wood, squirrels and other rodents do. Using wire cloth is a preventive measure to ensure the longevity of the bat-proofing. If your attic has a vent, hardware cloth may be used to seal that potential entry point as well.
About Bats
Once established, a healthy collective of bats can prove a great asset to your property by eating mosquitos and other flying pests (bats’ favorite food sources) and acting as pollinators. Whether you take the professional or do-it-yourself bat removal approach, bats will continue to return to a roost, especially one that is long-established. The best way to encourage a mutually beneficial ecosystem long-term is by investing in and properly installing one or more bat houses close to the previously infested structure. This provides an alternative nest so you can continue to reap the benefits of having bats nearby. There's quite a bit of opinion on whether painting, staining or leaving natural is better. Having built nearly a dozen boxes, I honestly don't think it matters, tho some weather stain will help it last longer, and the bats don't seem to care either way.
Leaf Miners: How to Prevent and Get Rid of These Pests from Your Garden
Cut the shape closest to the edge first, then cut the whole bat from the sheet. Because both halves of the cutline need to look clean, work slowly and carefully. Whenever you get to a drill hole at one of the points, stop the saw and turn it before you continue.
Using a jigsaw or a scrollsaw, start cutting out the shape of your bat logo. If you decide to use a jigsaw, it's best to clamp your logo down to a table to avoid it moving as you work and causing you to cut the piece improperly. Take nibbles out of sections removing enough so that you can follow the next contour as closely as possible. One bat can eat upwards of 1000 bugs, including mosquitoes, per hour.
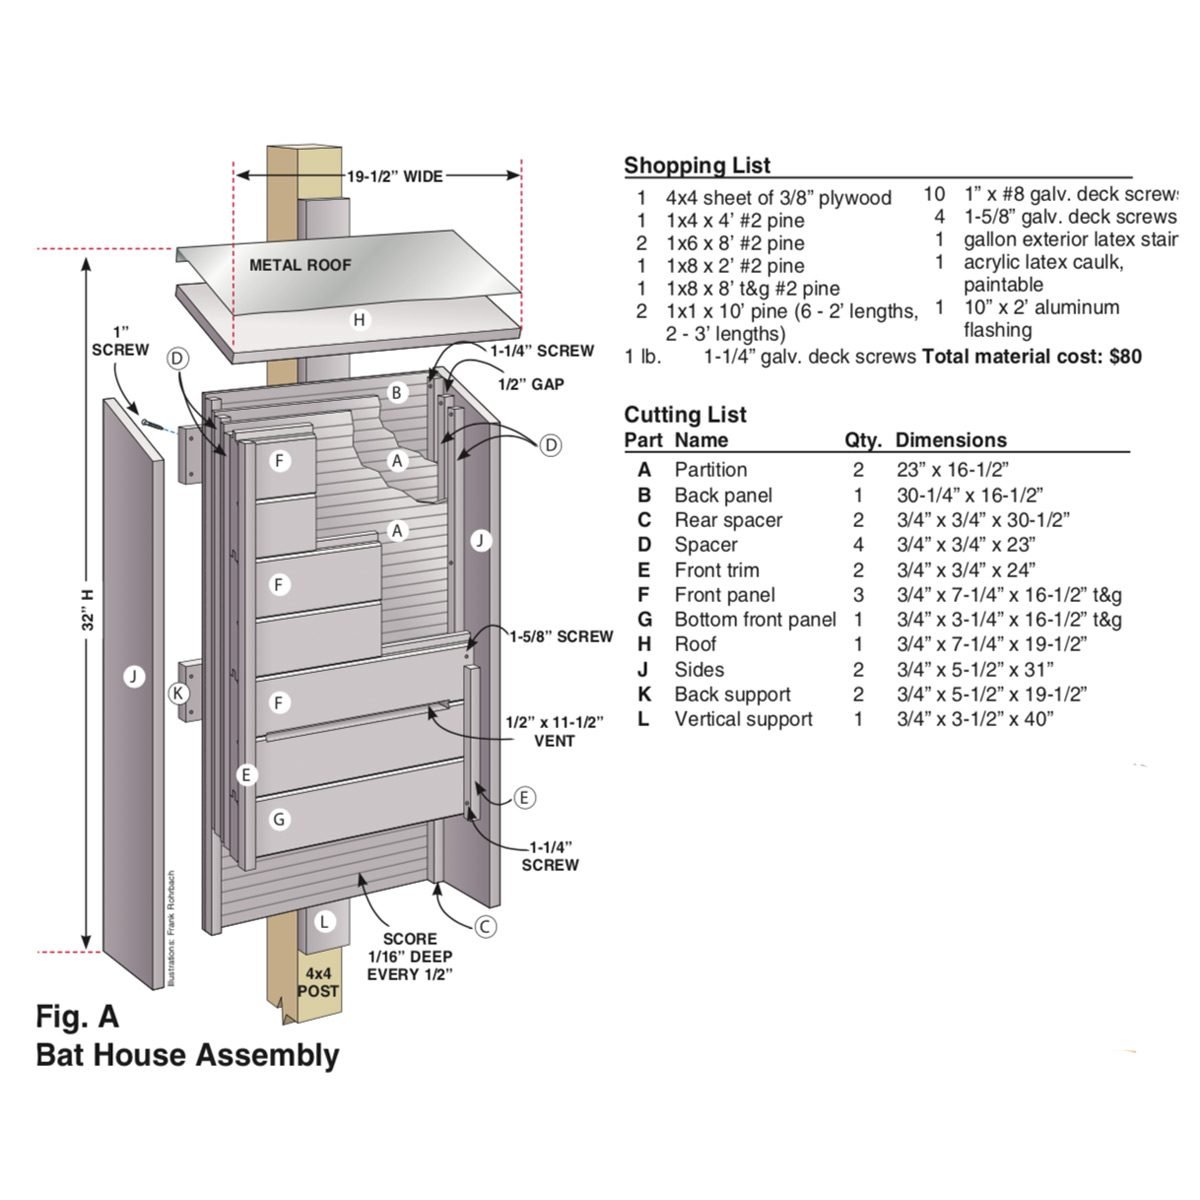
Just like what is shown in the photo above, this is a simple yet very useful bat house. With the house assembled, all that’s left is a bit of touch-up sanding to relieve the sharp edges before painting. Finally, attach the roof to your house with glue and screws. Next, stack the partitions and spacers (F) and dry clamp the two sides to the stack with their back edges up. This ensures the two sides are spaced perfectly before you attach them to the back. Lay out the two sides on a piece of exterior grade, 3⁄4” plywood.
This kit includes a premade bat house—no assembly or bat house plans required. These bat houses come with acrylic paints and brushes, allowing nature lovers to focus on making the home look nice instead of assembling it. The cedar bat house is 20 inches tall and 5.5 inches wide, with a rough texture for better bat grip. For those who really like to sink their teeth into a project, this two-chamber bat house plan is a terrific way to spend an afternoon.
Each bat will have a different maternity season, which will dictate the exclusion period you will need to follow. After your bat problems have ended, you’ll need to fix any areas that were damaged by the bats or the removal process. Restoring any damaged insulation or wood in the attic is a good place to start, along with repairing or cleaning any exterior damage around their entry points. Neutralizing the odor is not only desirable, it’s essential because scent draws bats back to the roost. Bats have excellent homing instincts and can live up to 30 years. Thanks to their superior sense of smell, every measure must be taken to prevent them from returning to a roost they may have occupied for years.
There is good reason for avoiding personal preference in this case. Because bats prefer warmer temperatures, depending on where you live, the color of the house should ideally be one that helps retain heat. The further north you live, the darker your bat house should be. Square the front and back panels, then cut grooves. Once these two panels are dry according to the glue manufacturer’s instructions, trim both ends of one panel, squaring them to its edges. The easiest tool for this is a crosscut sled on your table saw.

Below we've provided three quick tips for you to get started. Mounting a bat house on your property is the perfect way to help bats who are in need of a safe place to live while protecting your yard from pesky night-flying insects. Caulk along the face of the 1x2s on the back section. Place the front piece onto the 1x2s, with the bat shape facing the bottom, and the top edges and corners lined up.
Besides being the only mammal that flies, most North American bats are nocturnal insectivores, which means they feed on night-flying insects—especially mosquitoes. In fact, a small bat can devour more than 600 mosquitoes in a single hour. So encouraging bats to nest near your house is a natural way to keep your yard bug-free. Well, if so, then you might want to check out this resource. However, you did get a great picture of what the bat house is supposed to look like. If you think you can go off of a few instructions and a general picture then this could be a good design for your bat house.
Nature on your doorstep - RSPB
Nature on your doorstep.
Posted: Mon, 09 Oct 2023 13:39:31 GMT [source]
Using a caulk gun, lay a bead of caulk along the face of the long 1×2. Line it up with the top edge of the larger piece of plywood, and clamp it in place with spring clamps. Using a drill/driver, drive 1-inch deck screws through the 1×2 and into the plywood every 6 inches to hold it in place.


No comments:
Post a Comment